我会继续走下去,绝不会倒下。(加载时间略长)


导航
侧边栏

华为USG防火墙零配置开局-PPPOE篇
作者:irislc时间:2025-06-15 03:49:50分类:现网实操/模拟
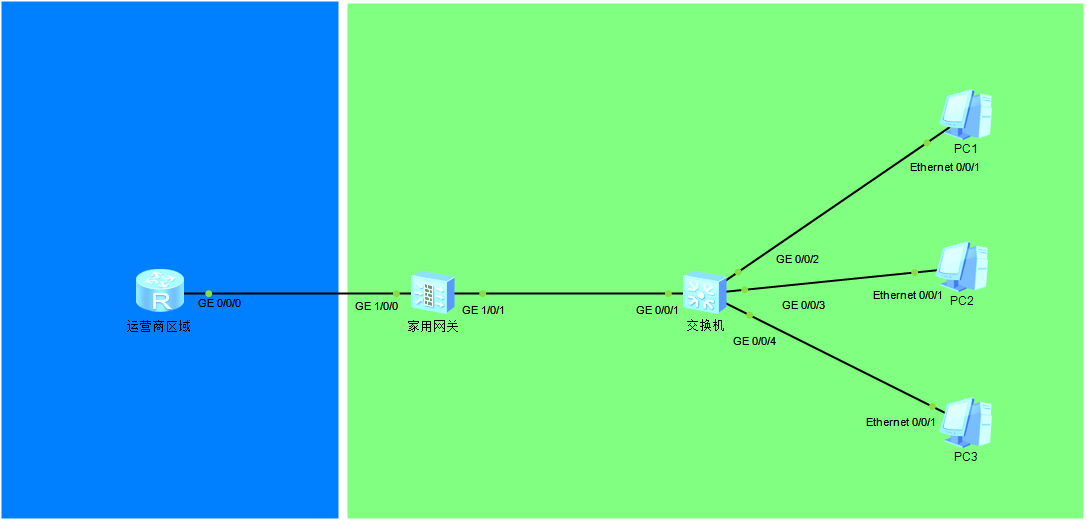
似乎挺多人写这个零配置开局的,那我就写详细点吧,很经典的一个拓扑,适合工作室/家用场景。
零配置的防火墙开局会要求你重置密码,按提示操作:
Username:admin    //出厂默认用户名
Password:         //出厂默认密码  Admin@123
The password needs to be changed. Change now? [Y/N]: y   //提示更改密码,输入y
Please enter old password:        //旧密码,也就是Admin@123
Please enter new password:        //新密码
Please confirm new password:      //再输一遍新密码
开始配置PPPOE,先把光猫改成桥接模式(这个只能自己想办法改),由于不确定运营商的PPPOE服务器采用的是chap还是pap,所以两个都配进去试一下。
<USG6000V1>system-view
[USG6000V1]interface Dialer 1  //进入Dialer 1接口
[USG6000V1-Dialer1]dialer user date    //date是你拨号的账号名
[USG6000V1-Dialer1]dialer bundle 1    //用于物理接口绑定
[USG6000V1-Dialer1]ppp chap user date   //拨号账号
[USG6000V1-Dialer1]ppp chap password cipher date   //cipher接拨号密码
[USG6000V1-Dialer1]ppp pap local-user date password cipher date  //local-user后面接拨号账号,cipher后面接拨号密码
[USG6000V1-Dialer1]ip address ppp-negotiate   //IP协商
[USG6000V1-Dialer1]quit
[USG6000V1]interface g1/0/0     //进入和光猫桥接的那个接口
[USG6000V1-GigabitEthernet1/0/0]pppoe-client dial-bundle-number 1  //绑定上面设置的bundle编号
验证一下是否获取到了IP
[USG6000V1]display ip interface brief
2025-06-15 04:26:54.570
*down: administratively down
^down: standby
(l): loopback
(s): spoofing
(d): Dampening Suppressed
(E): E-Trunk down
The number of interface that is UP in Physical is 5
The number of interface that is DOWN in Physical is 6
The number of interface that is UP in Protocol is 3
The number of interface that is DOWN in Protocol is 8

Interface                         IP Address/Mask      Physical   Protocol
Dialer1                           202.0.0.254/32       up         up(s)     //可以看到接口已经获取到了IP
GigabitEthernet0/0/0              192.168.0.1/24       down       down
GigabitEthernet1/0/0              unassigned           up         down
GigabitEthernet1/0/1              unassigned           up         down
GigabitEthernet1/0/2              unassigned           down       down
GigabitEthernet1/0/3              unassigned           down       down
GigabitEthernet1/0/4              unassigned           down       down
GigabitEthernet1/0/5              unassigned           down       down
GigabitEthernet1/0/6              unassigned           down       down
NULL0                             unassigned           up         up(s)
Virtual-if0                       unassigned           up         up(s)
配置nat策略
[USG6000V1]nat-policy    //进入nat策略视图
[USG6000V1-policy-nat]rule name pppoe   //设置规则名称
[USG6000V1-policy-nat-rule-pppoe]source-zone trust    //源区域为trust
[USG6000V1-policy-nat-rule-pppoe]egress-interface GigabitEthernet 1/0/0    //出接口配置为pppoe拨号的那个接口
[USG6000V1-policy-nat-rule-pppoe]action source-nat easy-ip     //配置源区域的easy-ip
配置安全区域
[USG6000V1]firewall zone untrust      //进入untrust视图
[USG6000V1-zone-untrust]add interface g1/0/0    //将出接口加入untrust区域
[USG6000V1-zone-untrust]add interface Dialer 1    //将拨号接口加入untrust区域
[USG6000V1]firewall zone trust        //进入trust视图
[USG6000V1-zone-trust]add interface g1/0/1    //将内网,也就是图中和交换机连接的接口加入trust区域
配置安全策略
[USG6000V1]security-policy    //进入安全策略配置视图
[USG6000V1-policy-security]rule name any-untrust    //定义规则名称
[USG6000V1-policy-security-rule-any-untrust]source-zone any   //源区域为any
[USG6000V1-policy-security-rule-any-untrust]destination-zone untrust    //目的区域为untrust
[USG6000V1-policy-security-rule-any-untrust]action permit     //执行动作为允许
[USG6000V1-policy-security-rule-any-untrust]quit   //回到安全策略视图
[USG6000V1-policy-security]rule name untrust-local-trust   //定义规则名称
[USG6000V1-policy-security-rule-untrust-local-trust]source-zone untrust  //源区域为untrust
[USG6000V1-policy-security-rule-untrust-local-trust]destination-zone local   //目的区域为local
[USG6000V1-policy-security-rule-untrust-local-trust]destination-zone trust    //目的区域为trust
[USG6000V1-policy-security-rule-untrust-local-trust]action permit   //执行动作为允许
[USG6000V1-policy-security-rule-any-untrust]quit   //回到安全策略视图
[USG6000V1-policy-security]rule name local-trust   //定义规则名称
[USG6000V1-policy-security-rule-local-trust]source-zone local   //源区域为local
[USG6000V1-policy-security-rule-local-trust]destination-zone trust   //目的区域为trust
[USG6000V1-policy-security-rule-local-trust]action permit    //执行动作为允许
至此,外网部分已经被彻底打通了,可以在防火墙上ping外网IP试一下。
接下来配置内网部分
[USG6000V1]dhcp enable   //防火墙使能dhcp
[USG6000V1]ip pool ipv4   //创建ipv4地址池
[USG6000V1-ip-pool-ipv4]network 192.168.1.0 mask 24   //配置ipv4网段
[USG6000V1-ip-pool-ipv4]gateway-list 192.168.1.1      //配置网关
[USG6000V1-ip-pool-ipv4]dns-list 223.5.5.5 8.8.8.8   //配置dns服务器
[USG6000V1]int g1/0/1     //进入内网接口
[USG6000V1-GigabitEthernet1/0/1]ip address 192.168.1.1 24   //配置一个自己想要的网段
[USG6000V1-GigabitEthernet1/0/1]dhcp select interface       //使能接口dhcp
[USG6000V1-GigabitEthernet1/0/1]service-manage ping permit   //允许接受icmp包
[USG6000V1-GigabitEthernet1/0/1]service-manage http permit   //开启http访问(web)
[USG6000V1-GigabitEthernet1/0/1]service-manage https permit  //开启https访问(web)
配置静态路由,缺省路由和明细路由二选一
ip route-static 0.0.0.0 0.0.0.0 GigabitEthernet1/0/0   //缺省路由
ip route-static 192.168.1.0 24 GigabitEthernet 1/0/0   //明细路由
配置交换机
[Huawei]dhcp enable   //使能dhcp
[Huawei]lldp enable   //使能lldp
配置完成之后pc就可以dhcp获取到ip了,那么一个简单的局域网就配置完成了
最后可以在防火墙上配置一个双向nat,使内网可以访问出口IP+端口
[USG6000V1]nat-policy    //进入nat策略视图
[USG6000V1-policy-nat]rule name nat-nat   //设置规则名称
[USG6000V1-policy-nat-rule-nat-nat]source-zone trust   //配置源nat区域
[USG6000V1-policy-nat-rule-nat-nat]destination-zone trust    //配置目的nat区域
[USG6000V1-policy-nat-rule-nat-nat]destination-address 192.168.1.0 24   //配置目的nat区域的网段,也就是内网网段
[USG6000V1-policy-nat-rule-nat-nat]action source-nat easy-ip     //配置源安全区域easy-ip